The last project I worked on (a rechargeable battery analyser) was the most complicated Arduino project I have written in terms of software. Up until this point, my projects have been much simpler and I haven't missed testing them too much.
That being said, I hate writing code without using TDD. I could go on at great length about why this is and why writing a failing test before you get stuck into the code will make your life so much better, your code cleaner/better structured, reduce your development time and probably get you a hot girlfriend. Actually, if you talk about TDD in public, that last part is most likely not going to come true, but I had to trick Google into raising this post's search rank somehow.
Anyway, the reason I'm not going to talk about any of those things is that seeing as you're here, you probably already know all that stuff and just want to get your test environment set up. I had a really slow and frustrating time trying to get any test framework up and running in my Arduino development environment. I don't think that much of the Arduino world cares about testing because I found next to no information and had to work most things out for myself. There are definitely some people who do care care, though, so hopefully our numbers will grow. Anders Arnholm went to the effort to create mocks for the main Arduino classes and shared them in his arduino-mock project, which has been forked several times. Many thanks for that!
My goal is to test the bulk of my code without using any of the Arduino functions i.e. I will be testing my application's logic only. There will be some cases where it makes sense to check the interactions between my code and the Arduino libraries, which is where arduino-mock will come in. This allows the tests to be run on my development machine (I will not be trying to deploy tests to run on the Arduino itself). This in turn makes for a quick turnaround when running the tests, which is essential for the way that I develop. I will generally write 1 line or less of code before switching between writing a test and writing production code.
My goal is to test the bulk of my code without using any of the Arduino functions i.e. I will be testing my application's logic only. There will be some cases where it makes sense to check the interactions between my code and the Arduino libraries, which is where arduino-mock will come in. This allows the tests to be run on my development machine (I will not be trying to deploy tests to run on the Arduino itself). This in turn makes for a quick turnaround when running the tests, which is essential for the way that I develop. I will generally write 1 line or less of code before switching between writing a test and writing production code.
This is my environment:
- Sloeber v4.0 (the excellent Eclipse-based Arduino IDE written by Jan Baeyens)
- Google Test/Google Mock v1.8.0
- macOS Sierra (10.12.3). I wish I wasn't on a Mac, but I needed it for work and now I'm stuck with it. I dream of the day I can ditch it for a Linux setup again!
Disclaimer:
Tutorials written in this manner are quite "fragile". If anything differs between your and my development environments, or versions of software move on, things might not work out as expected for you. Hopefully, though, in seeing how I got tests running in my environment will give you enough knowledge to tweak things to get them running on yours
1. Create new project
Obviously, use whichever values make sense for your setup.


Now you should have an empty project called unit_testing:

2. Create folder structure
Within your project, create these directories:
- lib
- include
- src/test


3. Install CMake
To build the arduino-mock library, you will need CMake. Install it, then get it running on the command line following the useful instructions shown in-app:

Once you can view the CMake version in your terminal, you know you're good to go:

Download and extract arduino-mock in a temporary location.


Once you can view the CMake version in your terminal, you know you're good to go:

4. Build arduino-mock
I wanted to be able to mock objects. You don't have to do this. I actually got the setup working with only Google Test to start with. To do that, ignore anything that follows about arduino-mock and just build the Google Test project, then add libgtest_main.a to your project.Download and extract arduino-mock in a temporary location.

Create another temporary directory and CD into it in a terminal. From there, run:


cmake path/to/extracted/arduino-mockOnce that finishes, from the same location (i.e. the second temp. directory), run:
makeYou should see make downloading the Google Test project and building everything. I just realised that you might not have make installed. If you don't, Google knows!
5. Copy libraries to project
You need to copy the libraries you just built into your project. Put libarduino_mock.a and libgmock_main.a into the lib directory that you created in step 2. You have to dig down to find the gmock library:

Now copy these three directories into the include directory of your project:
- include/arduino-mock from the extracted zip of arduino-mock (the first temporary directory you created)
- lib/gtest/gtest/src/gtest/googletest/include/gtest from the second temporary directory (where you ran make)
- lib/gtest/gtest/src/gtest/googlemock/include/gmock from the second temporary directory (where you ran make)

6. Create build configuration
Create a build configuration that you will use to build your unit tests. This is done in the properties page for the project (right-click the project -> properties):
Choose the most appropriate build type to import based on your system. You basically need a build that will create an executable on the platform you are developing on, because that's where the tests will run (i.e. your desktop/laptop and not the Arduino!).
7. Include/exclude items from the builds
Make sure you're working with the gtest configuration that you just created (you might need to switch from 'Release' in the drop-down).Add the lib directory as a library search path in the linker settings:


Add the root project directory, the include and the src/test directories to the compiler's include paths:

Exclude the core directory from the gtest configuration:

Exclude the Arduino sketch file (.ino) from the gtest configuration:


Exclude the src/test directory from the Release configuration (i.e. the configuration that builds your Arduino code for deployment)

If you see "Program -E not found in PATH" in the problems view, set the Arduino board details for the gtest configuration. I don't think this problem would actually stop anything from working, but it's annoying to have it there! There's probably a better way of solving this issue. Ideally, we would get Sloeber to ignore the gtest configuration altogether. If you know how, please comment and tell me!

8. Open the C++ perspective
This perspective makes it easy to switch between build configurations and to launch the tests when we get to that stage:

Use this button to switch between build configurations and to run the build:

9. Create demo unit tests
Set the contents of the sketch file, unit_testing.ino to this, taken from the arduino-mock-sample project: #ifndef UNIT_TESTING
#include "Arduino.h"
#endif
/*
DigitalReadSerial
Reads a digital input on pin 2, prints the result to the serial monitor
This example code is in the public domain.
*/
// digital pin 2 has a pushbutton attached to it. Give it a name:
int pushButton = 2;
// the setup routine runs once when you press reset:
void setup() {
// initialize serial communication at 9600 bits per second:
Serial.begin(9600);
// make the pushbutton's pin an input:
pinMode(pushButton, INPUT);
}
// the loop routine runs over and over again forever:
void loop() {
// read the input pin:
int buttonState = digitalRead(pushButton);
// print out the state of the button:
Serial.println(buttonState);
delay(1); // delay in between reads for stability
}
Create an example file that holds your "application logic", Bob.cpp:

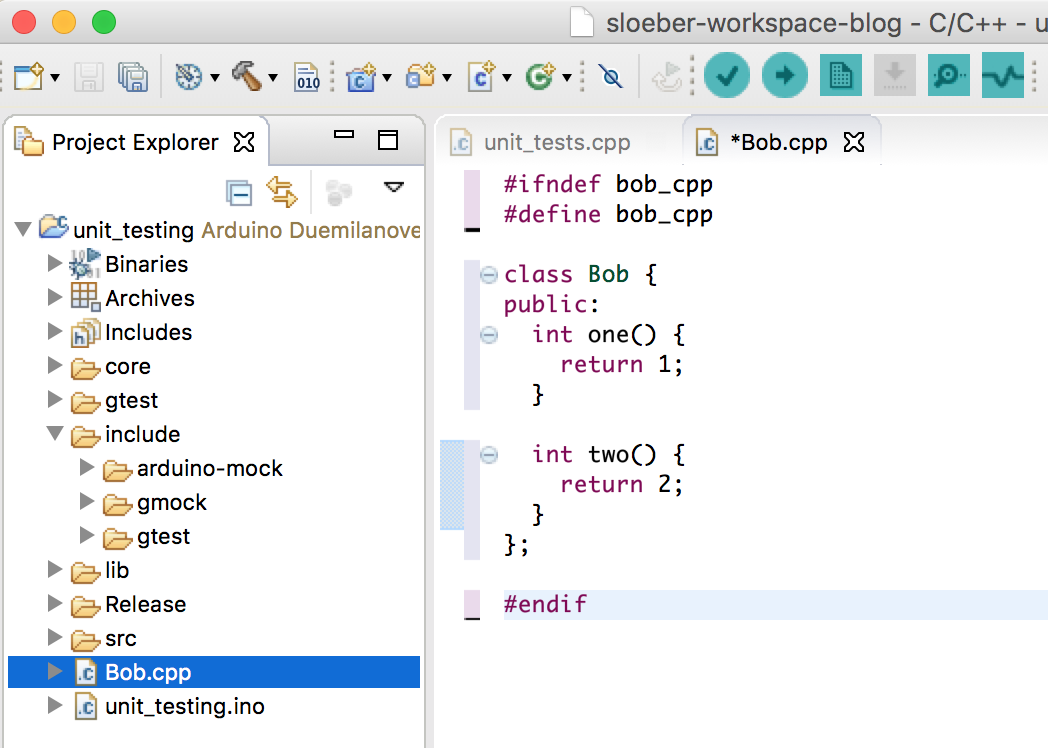
This is the content of Bob.cpp:
 #ifndef bob_cpp
 #define bob_cpp

 class Bob {
 public:
  int one() {
   return 1;
  }

  int two() {
   return 2;
  }
 };

 #endif
Create example unit test file src/test/unit_tests.cpp with this content:
 #define UNIT_TESTING

 #include "gtest/gtest.h"
 #include "arduino-mock/Arduino.h"
 #include "arduino-mock/Serial.h"
 #include <Bob.cpp>
 #include "../../unit_testing.ino"

 using ::testing::Return;

 TEST(MathTest, TwoPlusTwoEqualsFour) {
  EXPECT_EQ(4, 2 + 2);
 }

 TEST(BobTest, BobOne) {
  Bob bob;
  EXPECT_EQ(1, bob.one());
 }

 TEST(BobTest, BobTwoWillFail) {
  Bob bob;
  EXPECT_EQ(999, bob.two());
 }

 TEST(loop, pushed) {
  ArduinoMock* arduinoMock = arduinoMockInstance();
  SerialMock* serialMock = serialMockInstance();
  EXPECT_CALL(*arduinoMock, digitalRead(2)).WillOnce(Return(1));
  EXPECT_CALL(*serialMock, println(1, 10));
  EXPECT_CALL(*arduinoMock, delay(1));
  loop();
  releaseSerialMock();
  releaseArduinoMock();
 }
Run a build, to make sure that the executable has been generated for the next step. Ensure that gtest is the current configuration (select the drop-down by the hammer icon), then click the hammer icon to run the build
10. Create run configuration


In the page shown below, you need to browse and select the executable that is produced by the gtest build configuration. It will be located within your [workspace]/[project]/gtest directory


Now hold your breath and click Run. If all goes to plan, you should have 3 passing tests and 1 failing test, which was coded specifically to fail, to check that Google Test is doing its job OK.

If this isn't what happens, it's time to locate the palm of your hand, then locate your forehead, then help those two items locate each other:

I did this many times before I got the whole thing working! If you have followed each step exactly, comment with as much detail as you can about what's not working and I'll try and help.
I'm so very glad you posted this. I have several Arduino projects that I have regrettably developed without TDD. It looks like with Eclipse CDT, Sloeber, Google Test, and your Arduino Mock, I'll finally get to do IoT development with TDD.
ReplyDeleteI found one possible improvement for your instructions. Instead of defining UNIT_TESTING in each test file, that define can be added to the run configuration.
Thanks for the tip, Frank. I hope you get it working. I saw that Jantje published a video on unit testing shortly after I wrote this post. I haven't watched it yet, but it might be worth checking out:
Deletehttps://www.youtube.com/watch?v=d-Vt21BIHl0
Did you know I posted a video on how I do this?
ReplyDeleteThere are definitely things here that can be used for improvement :-)
Like the mockup arduino I didn't know about.
Best regards
JAntje